Category Archives: Inky Antics

Sing to the Lord

This week the Scor-Pal team hopped with the gals from Really Reasonable Ribbon…what fun!  Today I will be sharing my projects that were featured on the Scor-pal blog.  Of course, if you missed this project or any of the other great projects from the Scor-pal team you’ll want to hop on over there and see what’s been going on. Be sure to leave comments on each post from this week for a chance to win some great prizes. Entry deadline in 8am Monday, July 16, so there’s still time.

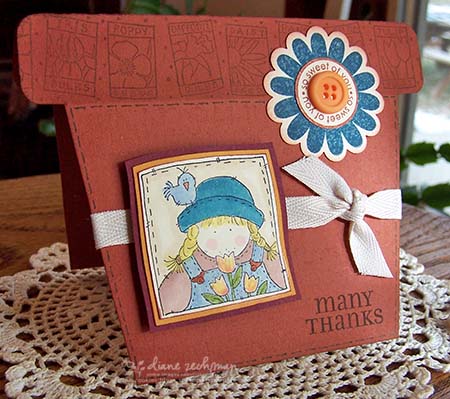
I made two projects using the Scor-Pal and the fabulous ribbon.  First, a card…

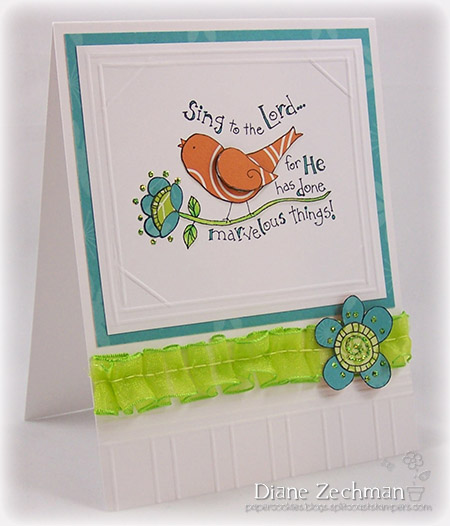
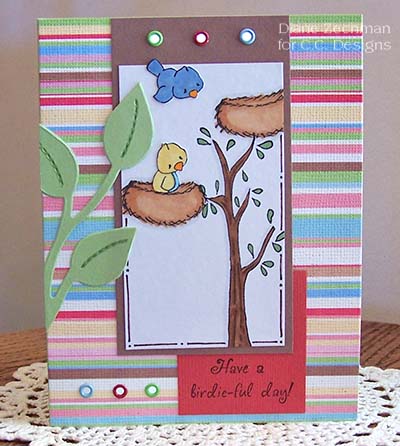
I wanted the image and the ribbon to stand out so I did some simple scoring to accent them.  The top was scored with lines to create a double border, and then diagonal lines were scored on each corner.  The bottom has both vertical and horizontal scored lines.

The bird was paper pieced and his wing was popped with a dimensional.  I love the sheer box pleats ribbon and I think it sort of mimics the flower stem.  The ribbon was attached with a thin strip of Scor-Tape.

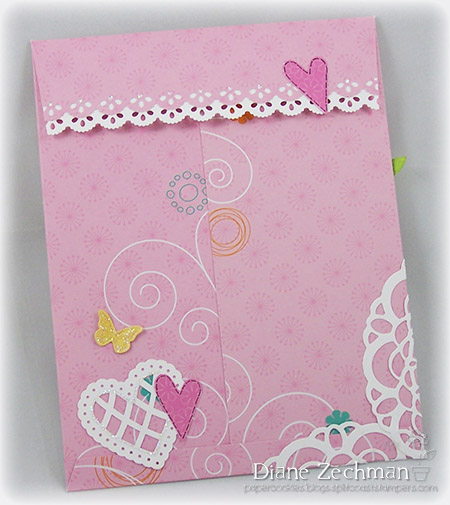
Next, I was just playing around with my Scor-Pal and came up with a flat envelope.  The finished size is 5 1/2″ x 7″.  It could be used to tuck a card, note, or gift inside (maybe a Hershey bar or two would be nice?)

I started with a piece of 9 x 12 paper.  (I saved the 3 x 12 piece to flip over and layer onto the top of the front).  Score the 12″ side @ 3 and 8 1/2.  Score the 9″ side @ 1/2 and 7 1/2.  Cut away the shaded areas as shown below.  (Click on the image for a larger view).

Fold the sides in and attach back with Scor-Tape.  Fold the bottom up and attach with Scor-Tape.  Die cut or punch the edge of the top flap if desired.  Fold top flap down and secure with sticky-back velcro.  Decorate.

The back will look like this:

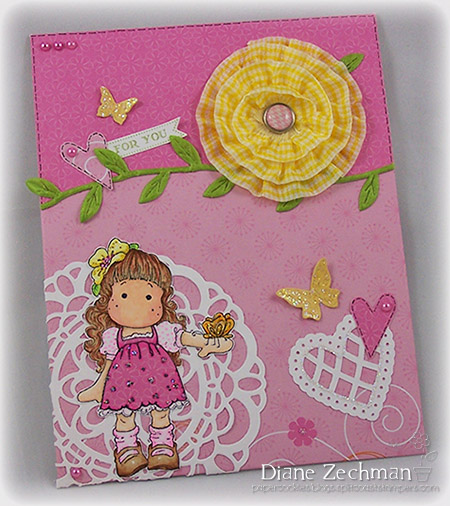
The big lace circle on the front was wrapped around to the backside.  I used a Magnolia image from the Magnolia-licious store…she’s so cute with her butterfly!

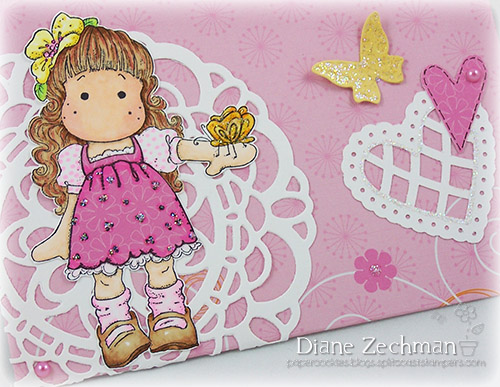
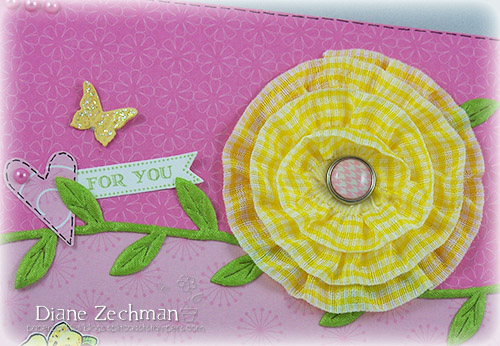
I also used some more awesome ribbon from the Really Reasonable Ribbon store.  The layered paper on the top was hand cut in a wavy pattern and a thin strip (half the width of the 1/8″ Scor-Tape) of tape holds the Lime Green Leaves ribbon in place.  Love those leaves!  I also punched a circle, applied 1/2″ Scor-Tape to cover it, and attached some Yellow Plaid Ruffle ribbon to create a flower.

Check out all the projects from this week on the Scor-Pal and Really Reasonable ribbon blogs!

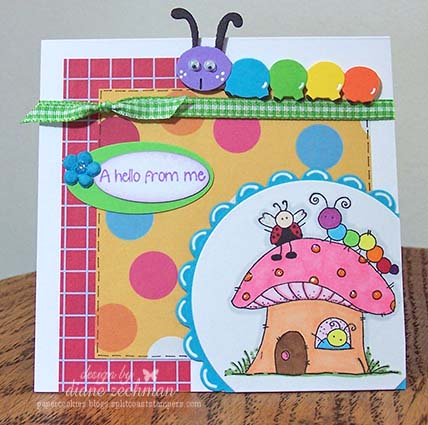
card: stamps- Inky Antics Groovy Nature; paper- white, Momenta Kaleidoscope; ink- Memento Tuxedo Black; accessories- Copics, Scor-Pal, Scor-Tape, Really Reasonable Ribbon- Sheer Box Pleats Parrot Green, dimensionals, Stickles.

flat envelope: stamps- Magnolia Tilda with Hawaii Flower, SU! Itty Bitty Banners; paper- white, Saffron, Momenta Kaleidoscope; ink- Memento Tuxedo Black, SU! Celery; accessories- Scor-Pal, Scor-Tape, Really Reasonable Ribbon- Yellow Plaid Ruffle and Lime Green Leaves, SU! Bitty Banners Framelits and Butterfly embosslit, sticky-back velcro, Sizzix Large Paper Doily die, 1 3/4″ circle punch, SU! Epoxy brad, Copics, Stickles, Martha Stewart pinking scallop and lace scallop heart punches, EK Success heart punch, adhesive pearls.


caterpillar cottage & a sketch

caterpillar-cottage-diane-zechman.jpgI have always thought that this Inky Antics image was cute!  The little critters on the mushroom rooftop just make me smile!  :0)  A few months ago I purchased the Sizzix Caterpillar die and it seemed to go well with the image so I knew I wanted to work it into the card somehow.  I tried to use a marker and dot him some eyes but it just didn’t look right.  Sometimes those little mess-ups make the card better in the end though.  I remembered that I had some teeny tiny wiggly eyes….and they fixed it up perfectly!  Then I used a black marker to color the antennae and the tips of his feet.  The sentiment is from the C.C. Designs Sentiment Set.  You can’t tell in the pic, but there’s Stickles on the ladybug’s wings!  I also added Stickles to the dots on the roof and the center of the flower.

stamps- Caterpillar Cottage- Inky Antics, Sentiment Set- C.C. Designs

paper- PTI white, dp- KI Memories, Turquoise, Lavander Lace, Green Galore, YoYo Yellow, Only Orange

ink- Palette Black, Lavander Lace

accessories- Copic markers, Circle Nestabilities, gel pen, Sizzix Caterpillar, wiggly eyes, Prima, Stickles

pcsc4-diane-zechman.jpgAs I was creating this card I thought it might be a good design for a sketch.  Would you like to try it?  I would love to have you play along!

If you create a card (or scrapbook page, 3-D item, etc.) using this sketch, please use the keyword PCSC4 when uploading to SCS (for Paper Cookies Sketch Challenge 4).  And don’t forget to link back here and let me know!  🙂  I would love to see your creations!

Have a great week and stay cool!  It’s supposed to be a hot one here!

Two challenges today!

29-again-diane-zechman.jpgHappy Wednesday!  Today I have two cards to share.  I found a box of DCWV cards and envelopes that I never used so I pulled some cute patterns out and used them for both of today’s cards.    The first one is for the Dirty Dozen/DD Alumni monthly challenge.  This month it was hosted by Jen (genie1314). She has a birthday this month, so she based her rules on that.  Here’s the info. we were given:

Challenge Focus: BIRTHDAY!

Required Element: NUMBERS!! You can use stamps, die cuts, embossing folders, chipboard… whatever kind of number you can get your hands on!

Restricted Element: You can’t use the word “birthday.” Be creative in wishing someone a happy birthday!

I made a pattern for the number 29 (the two and the nine are connected) and I originally wanted to cut the card base into the shape of the numbers.  But I decided that it wouldn’t leave much space for writing a message so I layered it onto the cardfront instead.  I carefully embossed only the number 2 with the Cuttlebug Number Collage folder.  Then I embossed the 9 with the Spots and Dots folder, being careful not to overlap the embossing already done on the number 2.

I thought the Inky Antics bunny would look cute as he wonders about the number.  Hmmm….29….again?

stamps- Inky Antics- Bunny Wonders, SU Typeset Alpha U & L

paper- DCWV, Celery, Shimmery White

ink- Black, Cocoa

accessories- circle punch, Twinkling H2O’s, Cuttlebug Number Collage and Spots & Dots folders

birdieful-day-diane-zechman.jpgMy second card is for Jen Ofiana’s sketch challenge over at All That Scraps.  I strayed a bit, adding the piece of red with the sentiment….hope that’s ok!  I just couldn’t get it how I liked it otherwise.  This is another DCWV card base and I used the set Olivia’s Birdies with the branch upright for a tree.  The leafy branch on the left is a Sizzix diecut.  And I just had to pull out some of my huge stash of eyelets and use some!

stamps- Olivia’s Birdies

paper- White, DCWV, Cocoa, Celery

ink- Palette Black

accessories- Copic markers, eyelets, Sizzix leaves

January DD/DDA challenge

The Splitcoaststampers Dirty Dozen and Dirty Dozen Alumni were challenged again by Jami! For January’s challenge, we were given the following rules:
Challenge Focus: Girls Young and Old,
Required Element: Something *SWEET*, and
Restricted Element: NO standard A-2 cards (4.25 x 5.5).
You can click here to see all of the cards uploaded for this challenge.

I immediately knew that I wanted to use one of the girls on the Inky Antics Hobby Girls cube. I love these images and don’t pull them out to use often enough! Then I thought it might be fun to make my card a flowerpot shape since the girl I chose was holding flowers. I thought I had a pattern for a flowerpot but after searching and not finding one in my patterns, I quickly created one of my own. Directions for how I made it are below. After I cut the flowerpot card out, I masked the top and sponged with ink to create the look I needed for the top of the pot. Then I realized that the new SU! Blooms & Bulbs wheel would fit perfectly in the area I sponged at the top. 🙂 Next I lightly wheeled the Rough Texture wheel over the base of the pot for a bit of added texture. The flower was stamped twice and layered from the SAB set So Many Scallops for my “something sweet”. The Many Thanks words are from another SAB set, Lots Of Thoughts.

flowerpot-girl-dmz.jpg

To make the flowerpot template, start with a 4 1/4″ tall x 5 1/2″ wide piece of cardstock.
Measure 1″ down from the top and 1/2″ in from each side to create the top of the pot. Mark those points. Draw a line on the 1/2″ measurement for cutting.
Next, measure 1″ in from each side at the bottom and mark those points. Draw a line down both sides from the top points to the bottom points. This is the line you will cut to make the sides of the pot.
Use a corner rounder on the top corners.
Now place the top of the pot on the fold of your cardstock. Trace & cut out your card. Very easy!

stamps- Inky Antics Hobby Girls cube, Rough Texture wheel, Blooms & Bulbs wheel, So Many Scallops (SAB set), Lots Of Thoughts (SAB set)
paper- Vanilla, Non-SU!
ink- Rust, Caramel, Rose Red, Summer Sun, Not Quite Navy, Olive, Bashful, Choc. Chip
accessories- Scallop punch, circle punch, twill tape, button, pop dots, sponge