Category Archives: digital images

basket of stars

When I printed out Kim Hughes’ folk stars I immediately knew I wanted to place them into her Easter basket (minus the eggs, of course!)

I embossed a striped layer and then also a starry layer on top of that.  A little Stickles outlines the embossed stars…just enough to add a little sparkle and finish the card off.

Thanks for peeking in.  🙂

digital images- Paper Smooches basket and folk stars, paper- white; ink- Micron pen; accessories- Cuttlebug Stars and Candy Cane Stripes folders, Copics, SU! oval punch, Stickles.

digi bee in disguise

Yesterday I had some more fun with the Paper Smooches free digital images.  What I’ve really been doing is biding my time until I decide which sets I want to order.  ha!

Here I used the digi Bee and turned him into a ladybug…

I cut the bee’s stripes off the bottom, traced his head for the body, and relocated his wings.  😉

Thought that a flower shaped card would be cute to attach him to.  And I couldn’t help pulling out the same DCWV Citrus papers again.  They’re just so bright and fun and work great with Kim’s images! 

The text was printed onto a scrap of paper I had left from one of my previous projects.  It’s super easy…just print your text on regular printer paper.  Then attach your scrap of paper overtop of the text with removable adhesive and run it back through the printer a second time.  Easy peasy!

Tomorrow I will have another card I made with some different P.S. digis.  And this time I didn’t use the Citrus papers.  LOL.

digital images- Paper Smooches Bee and Thanks sentiment; paper- white, DCWV Citrus Stack; ink- Micron pen; accessories- Blossom Nestabilities, Copics, circle punches, brad.

bee happy

This weekend we had a chance to sneak a few flowers in the ground and planters.  It’s so nice to have a day or two without rain! 

I was inspired by our planting to come inside and create this card with a free digi image and sentiment by Kim Hughes.  Her images ooze with cuteness! 

The cute layout is from Kim’s Designer Drafts sketches #5 and I added some dots with a black pen across the top & bottom of the strips.  

I also applied Stickles to the bee’s wings…just a little something but it adds so much to the card.  And I used the new Spellbinders Grommet Tags for the sentiment.  So glad I purchased those!   

Bee happy today!

Digital images- bee & sentiment by Paper Smooches; paper- white, DCWV Citrus Stack; ink- Micron pen, accessories- Copics, Stickles, Spellbinders Grommet Tags, dimensionals.

a crafty purse tin

Last night I had fun playing with a “new-to-me” product from Letraset called Safmat.  It’s an adhesive-backed transparent film that you can print on with your computer.  Cool, huh?  All you need to do is print, peel off the paper backing, and apply it to your desired surface.  Easy!  The hardest part was thinking of what I wanted to create and designing it on my computer.  LOL.  Not really difficult, just took a bit of time. 

I found this purse shaped tin in my stash that I bought quite some time ago at Hobby Lobby on clearance.  Then as I was searching through my files, I found a pic that was taken last year this time after the Spring-Fest stamping event in Buffalo, NY.  I’ll be heading to the same event later this month and I am so anxious to see these friends again that I only get to see once a year…so this pic was perfect!

Once I created the photo, background, words, etc., the printing was simple.  I just changed the paper setting to A4 size and selected the Photo setting.  After printing, I trimmed it to fit with my paper trimmer, peeled the backing off and stuck it down.  I only had a few tiny air bubbles but I’m sure that was user error and should be better with practice.  I was able to press 99% of them out without difficulty.

Then I added some ribbon and trims with red-line tape and finished it off with a few Primas and a button.  Here’s a close up…

The bottom of the tin is not perfectly flat…it bows down in the middle and made the tin “rocky”.  So I added some button “feet” to the base…now it sits perfect!

Here’s a pic of the packaging if you would like to look for it.  You can buy it here on the Letraset site but I see it’s currently out of stock.  I do believe, though, that I read somewhere it will soon be available again.   Click here to see more ways to use the Safmat product.  I look forward to trying this again!


 Thanks for stopping by…have a great night!

fly a kite…or float in the pool

Today I have another card for the Dare To Get Dirty challenges.  This time I used October Afternoon’s Fly A Kite paper with C.C. Designs’ digi image, Pool Party Paula.  A sweet friend gave me this pad of paper as a thank you and I finally used it!  I ♥ it!

pp-paula-diane-zechman.jpg

Doesn’t the background paper remind you of the pattern on some pool liners?  ;0)

For this card, I played along with the challenge by Julie Warner (justwritedesigns).

I hope you are enjoying YOUR lazy days of summer!

digital image- Pool Party Paula by C.C. Designs; paper- Marigold, Caribbean, white, brown, October Afternoon Fly A Kite; accessories- oval punch, QuicKutz Polka Dots folder, ColorBok Metal Dots, Copics.

flower turtle

Today Christine is having a special digi release at All That Scraps…check it out!  I used the Flower Turtle image here and played along with a couple of the Dare To Get Dirty challenges on Splitcoast. 

flower-turtle-diane-zechman.jpg

I played along with the challenges set forth by CraftyCaro, Rainy, and gbedwright for this card.  I could probably stretch it and include flowergal36’s challenge but I’ll try to make another card for that one!  The light pink layer here has an embossed pattern that I created on my Scor-Pal. 

Today the contractors will be pouring the concrete for our garage.  So I’m sure I’ll be busy!  But I already have a project done for one of tomorrow’s challenges…I am a sample maker for my friend, Tracy’s challenge.  Be sure to check it out…I ♥ the other 2 samples that were made for it!

digital image- Flower Turtle by C.C. Designs; paper- Saffron, Pink Pirouette, white, DCWV, Making Memories; ink- Saffron; accessories- Labels 10 Nestabilities, Scor-Pal, glitter brads, ribbon, Prima, Stickles.

Li’l Donkey and Little Susie

Today it’s my turn to post a Stampavie project and this time I have 2 to share.

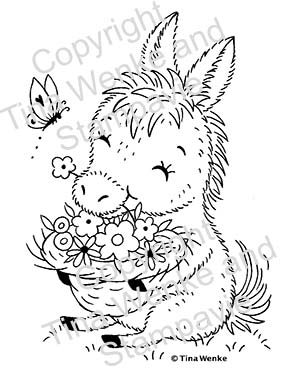
The first one is a card with Michelle’s Li’l Donkey, a sweet digi image drawn by Tina Wenke.  Click here to find out how you can download this image and at the same time, help raise money for Michelle.  We appreciate all of your help and support!  And also thanks to all of you who are posting on your own blogs to help us spread the word!

tw-michelles-donkey-diane-zechman.jpg

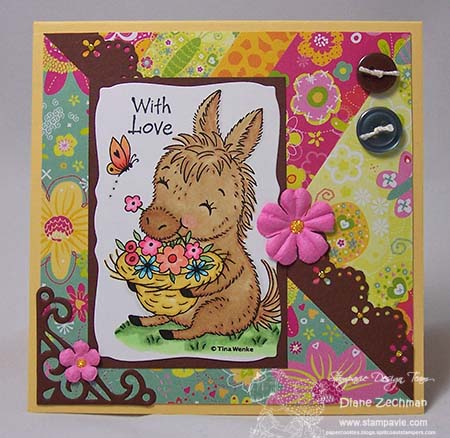
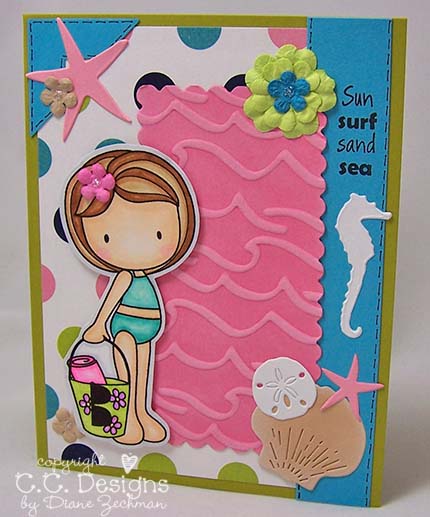
Is this Berry Sweet paper not fun?  I love it!  And this layout is great for using up scraps!

My second project is a corner bookmark.  The directions to make these can be found here on the Splitcoast website.

I used one of my Lelo Designs images called Little Susie.  Her dress is just perfect for paper piecing!

lelo-susie-bookmark-diane-zechman.jpg

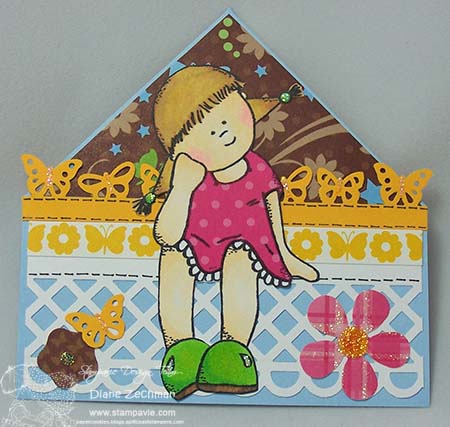
This is a great project for pulling out your punches!  They really add a lot to the finished project.

I hope you are staying cool wherever you are.  We are having hot, hot, hot weather!  Not good for trying to get projects done outside.  LOL.

Have a fabulous day…stay in and stamp!  🙂

Li’l Donkey card:

stamps- Michelle’s Li’l Donkey by Tina Wenke for Stampavie, words by Hero Arts; paper- white, Saffron, brown, K&Company Berry Sweet; ink- Memento Black; accessories- Martha Stewart Eyelet Lace punch, Mega Curved Rectangle Nestabilities, buttons, thread, Stickles, Primas, Cuttlebug Vintage die.

Corner bookmark:

stamps- Lelo Designs Little Susie by Stampavie; paper- Bashful, white, Summer Sun, DCWV Blossoms and Butterflies; ink- Memento Black; accessories- Martha Stewart Monarch Butterfly and Garden Trellis punches, EK Success Retro Flower and small flower punches, Stickles.

“Kickin’ It” For Michelle with a digi download!

Hello friends,

In our efforts to support our dear friend, Michelle Oatman, Tina Wenke and Stampavie have worked together to provide the *cutest* little donkey image as a digital download. 

Please visit the Stampavie DT blog to find out how you can download this sweet image.  In return, Stampavie simply asks that you donate $3 or more to Michelle’s PayPal fund.  Thanks for your support!

michelles-lil-donkey.jpg

Hugs,

Diane

Cookie Break

cookie-break-digi-diane-zechman.jpgHello all! 

I hope you are having a great weekend!  The sun is shining and the air is cool…a perfect fall day!

Over at All That Scraps, Christine has a few bonus images this month!  She has some super cute pilgrims and a bunch of Christmas images that will only be released in digital form. 

You can see the sneak peeks today and tomorrow on the ATS blog and the digis will be released on Monday.

Here I used the Santa image called Cookie Break.  I haven’t seen many Santas that are eating the cookies left for him so I thought this one was kinda unique…besides, you know I love cookies so I just had to print him out!  😉 

I used the largest Labels 8 Nestabilities die to cut the base of the card.  I loved how others did this and wanted to try it myself.  And it is hard to see in the photo, but I added a bunch of dots made with Stickles along the lines where the papers met.

Enjoy the rest of your weekend!

digital image- Cookie Break by C.C. Designs; paper- white, black, Olive, dp- Dream Street; accessories- Ovals and Labels 8 Nestabilities, ribbon, Prima, Martha Stewart Branch punch, cell phone bling, Stickles.

more Beachies!

beachies-ii-digi-diane-zechman.jpgTomorrow at All That Scraps, Christine will release 3 more Beachies…this time in digi.  The set is called Beachies II and they are adorable! 

Here’s a sample of one of the images.  To see all 3, check out the ATS blog and gallery!

I had my Emma all colored and then found some fun polka-dot paper to match.  Usually I color after I choose the paper, but sometimes I change it up.

I wanted to emboss the pink panel but I couldn’t find a Cuttlebug folder I was happy with.  Then I remembered the long-neglected Fiskars texture plates I have and found the perfect wave pattern!  These plates do not emboss as deep as the Cuttlebug folders, but if you lightly wet your cardstock before embossing it, the impression comes out much better!  I just wet my hand under the faucet and wipe my fingers over the paper to get it slightly moistened.

Some Cuttlebug diecuts and Primas were added for accents and I just had to add a tiny Prima to her hair.  ;0)

digi image- Beachies II by C.C. Designs; stamp- AmyR Beach Sentiments; paper- Regal, Turquoise, Kiwi, White, dp by Making Memories; ink- Palette Black, white craft; accessories- Copic markers, Primas, Long Rectangle Nestabilities, Fiskars Ocean Texture Plate, Cuttlebug From The Sea, Stickles.

Hope you enjoyed your weekend!  Tomorrow I’ll have a sample for the new Stampavie challenge.