Category Archives: Christmas

felt village

Yesterday I shared a Christmas card with the new Village Die Set. For today’s card, I die cut the shapes from felt for a soft, fuzzy textured village scene! I also used Sparkle Snowflakes Die Set and Christmas Gnomes (sentiment).

I was impressed…that teeny tiny cross on the top of the church cut perfectly!

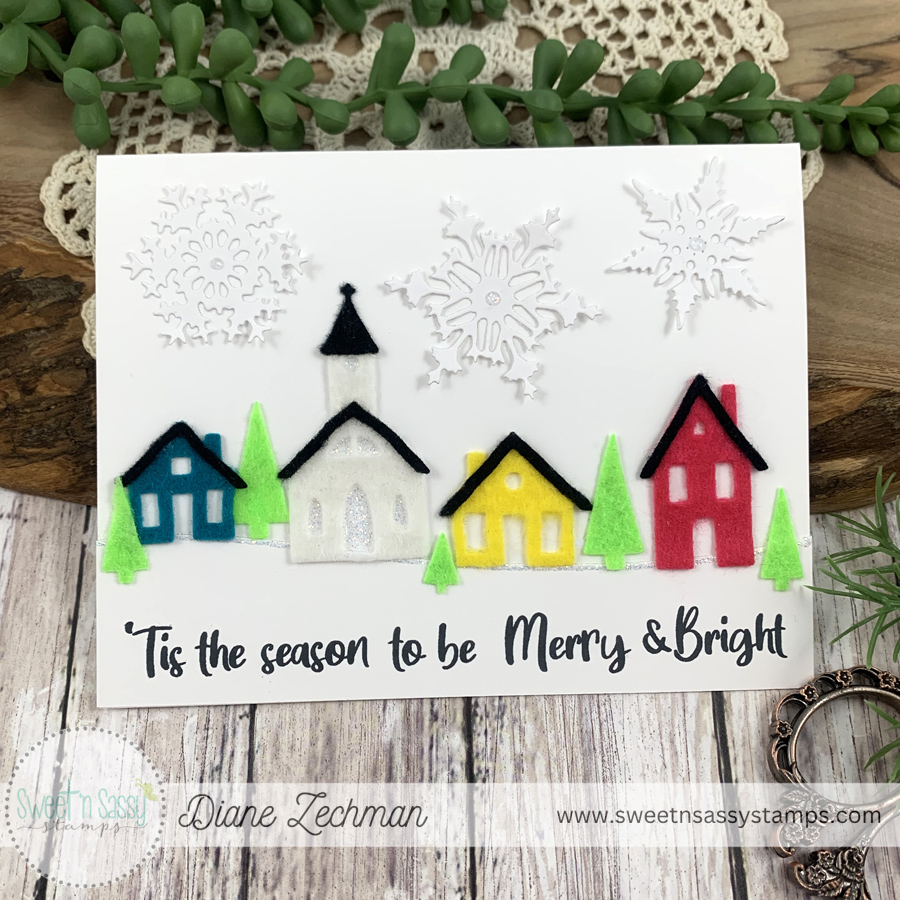
First, I used one of the landscape dies to cut a layer for the bottom and added the sentiment. Then I lined the curved edge with Stickles. When dry, I added the felt pieces using Aleene’s Felt and Foam Tacky Glue with a toothpick. It was easy and worked perfectly to adhere the felt to the card! Some Stickles were also used in the church windows and snowflake centers.

Have a great day!

from our home to yours

Good morning! Today Sweet ‘n Sassy Stamps is having their October Instagram Hop with card samples from the new release. Be sure to check over there for this card plus all the other projects in the hop, and comment on IG for a chance to win a $25 prize. You can find me on IG- @papercookies4u, and the hop will start at @sweetnsassystamps.

I am using the adorable new Village Die Set. Check out the sweet little houses and my favorite…a church! I layered some plaid paper strips onto the card base and then die cut one of the houses from the same plaid. Copic markers were used on a scrap of white cardstock and then I layered the plaid house on top so the markers would show through. A bit of Stickles was added to the windows for sparkle. The H,M, and E letters were die cut with the Bold Caps Alpha Dies, and the “from our/to yours” sentiment is from Christmas Pine. I also used the SU! Softly Falling embossing folder.

Enjoy the hop and be sure to comment on Instagram for a chance to win!

poinsettia wishes

Today I have one more Christmas card to share using products from the Sweet ‘n Sassy Stamps September release. Here I used Poinsettia Wishes Stamp & Die Bundle and the Holly Layering Stencils. The holly background was stenciled to be monochromatic and have a vintage feel. Then I added a piece of white doily, red ribbon and gemstones, and a red poinsettia. A few shimmery splatters were added for a bit of sparkle.

Have a great week!

merry Christmas cup

Today I’m sharing another Christmas card using the new Sweet ‘n Sassy Stamps Holly Jolly Stamp & Die Bundle, plus the I Like Big Cups stamp set.
I added a full A2 size striped paper to the base and then used a coordinating pattern to paper piece the cup. The holly was added and the sentiment was popped up. It still seemed to need a little something extra so I added some Stickles to the edge of the red layer, and then a few dots as well.

Have a great day!

merry little Christmas

Hello. Today I am using the Holiday Cheer Stamp & Die Bundle from this month’s Sweet ‘n Sassy Stamps release, along with the SNSS circle dies. I love CAS cards for the holidays so I kept this one simple! The holiday cup is popped up with dimensionals.

Have a great week!

vintage holly

I have another card today using the new Vintage Holly Stamp & Die Bundle from Sweet ‘n Sassy Stamps. This time I made the berries a traditional red. To give the card a little different look than the usual, I decided to adhere the sentiment strip and patterned paper layer on a slant. Then I stamped the words on the background to line up with them. The holly was popped up.

Have a great weekend!

pink poinsettias

When I sat down with the new Sweet ‘n Sassy Stamps Poinsettia Wishes Stamp & Die Bundle, I knew what inks to use on the flowers…pink poinsettias are my favorite!

I brushed a light blue ink on the center of the card front, then added the flowers. The petals were first stamped with a light pink ink. Then I sponged a little darker pink on the center of the stamps and stamped over the first impressions. A MISTI tool is so helpful in getting it perfectly aligned! The sentiment was popped up and I stamped a few of the flower centers in blue.

Have a great day!

sweet holiday wishes

Hello! I have several more Christmas cards to share this month. My card today uses the Holiday Cheer Stamp & Die Bundle and the Holly Layering Stencils from the Sweet ‘n Sassy Stamps September release.

I chose a light mint green cardstock to stencil the holly leaves on for the background. Then I cut it into three 1 1/4 x 5 1/4 strips. I found a scrap of pretty red ribbon to wrap around the center and then popped up the sentiment panel with foam tape. The candy canes were die cut and also popped up.

Have you started on your Christmas cards? I have a lot that I still need to make!

merry and bright holly

Good morning! Today Sweet ‘n Sassy Stamps is having their September Instagram Hop. The theme this month is Merry & Bright. Be sure to check over there for this card plus all the other projects in the hop, and comment on IG for a chance to win a $25 prize. You can find me on IG- @papercookies4u, and the hop will start at @sweetnsassystamps.

I used the new Vintage Holly Stamp & Die Bundle and Christmas Sentiments on my Mini Slimline card. This card is 3 1/4″ x 5 1/2″. I wanted to try making the berries a bright pink and also brightening the leaves. It’s such a fun set to create with and the sentiment goes perfectly with this color scheme!

Have a great day!

holly jolly

Hello! Today Sweet ‘n Sassy Stamps begins their September release and it’s full of Christmas fun! For this card, I used the new Holly Jolly Stamp & Die Bundle, plus the Circles Dies, Ticket Dies, and Bookmarks & More Dies.

I die cut the scalloped edge on the card front diagonally with a die from the Bookmarks & More Dies. The polka dot patterned paper was added to the bottom of the inside of the card. A few of the holly leaves were also cut from gold paper to give it some shine.

Enjoy the holiday weekend!