Category Archives: 3D and altered art

beach tote- AI hop with Tombow!

Hello and Welcome to the Tombow USA and Art Impressions Blog Hop!

Ai Tombow hop

You probably got here from Daniella Hayes’ blog but if you stumbled across my blog go the Art Impressions’ Blog to start!

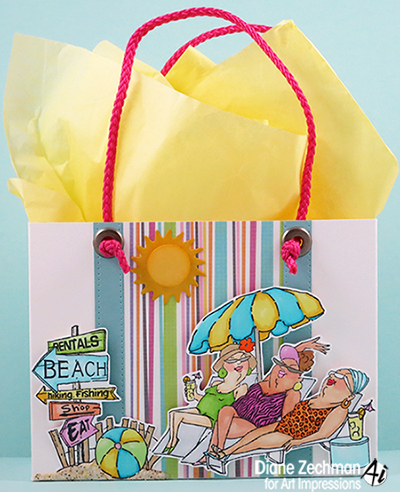
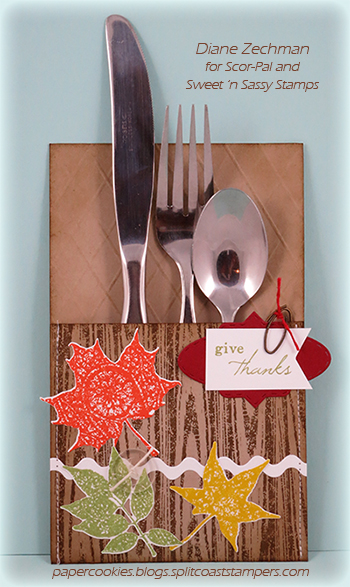
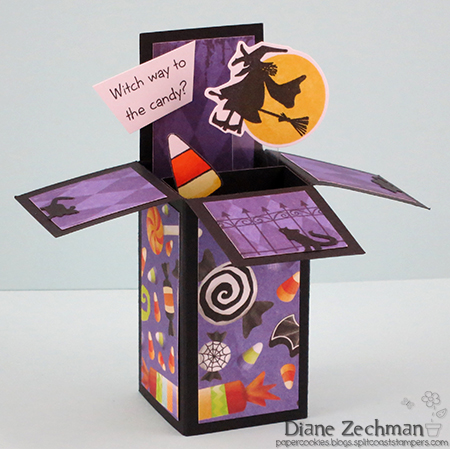
I made a Beach Tote Gift Bag for our hop today!  I used the Ai Loungers set (4473) and Beach TryFolds set (4577) to make my project. 

AI beach tote diane zechman

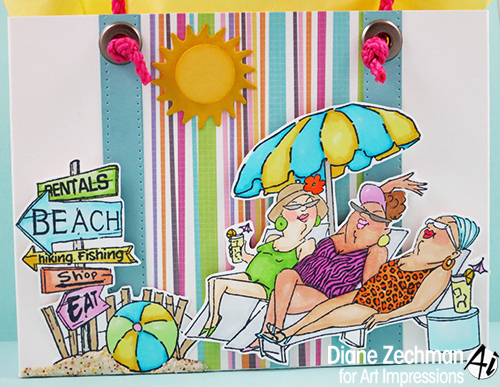
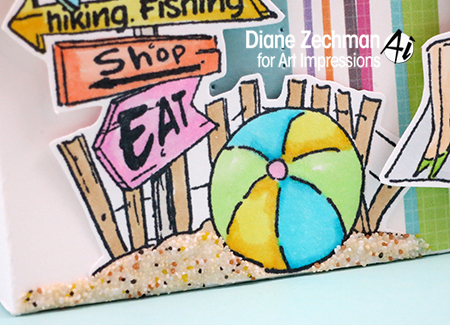
Here’s a close up of the Loungers and beach signs…

AI beach tote 4 diane zechman

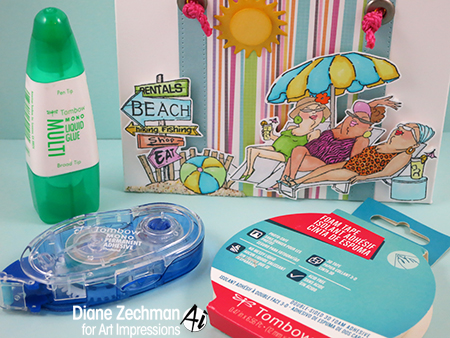
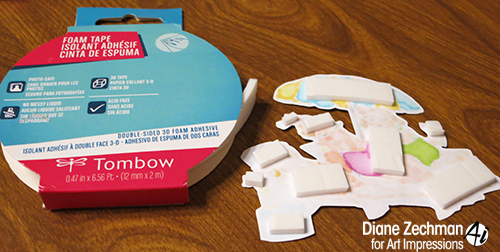
And here are the Tombow products I used to create my beachy gift tote… I LOVE Tombow so this was a fun project for sure!  I used Tombow Mono Multi Liquid Glue, NEW Foam Tape, and Mono Adhesive Permanent.

AI beach tote 6 diane zechman

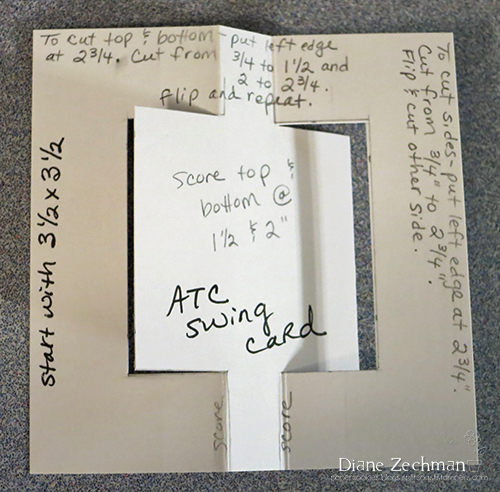
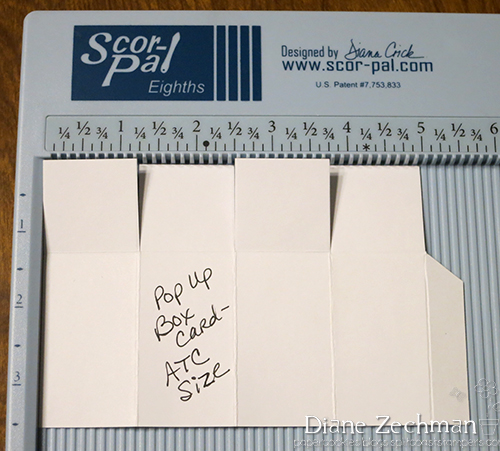
To make the base of the tote, cut and score as shown here:

AI beach tote 2 diane zechman

Fold the sides in and glue or tape where they overlap.  Then decorate as desired.  Add ribbon or cardstock strips for handles.  Tip: I recycled/reused cording from a shopping bag.  You can also save the cord from gift bags that have torn, etc. and need to be tossed.

After I colored my images, I used Tombow Foam Tape to pop them up.

AI beach tote 3 diane zechman

The Lounging ladies were fully popped, the beach signs were popped up at the top and glued down at the bottom.

AI beach tote 5 diane zechman

Below the signs I used Tombow Mono Multi Liquid Glue to add “sand” (Summer Mudd Puddles).

AI beach tote 7 diane zechman

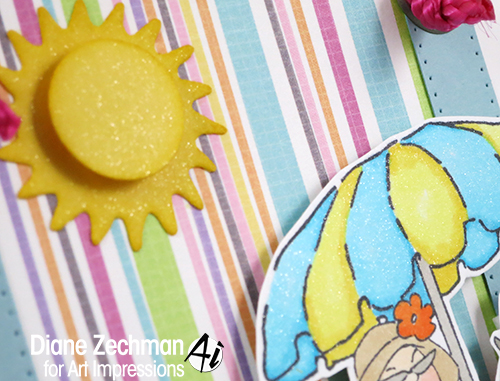
To make the bag a bit sparkly, I added Clear Wink of Stella to the sun, umbrella, beach ball, and their drinks.  😉

AI beach tote 8 diane zechman

Now be sure to check out the other AI and Tombow projects in the blog hop- they are fabulous!!  Plus here’s some FUN prizes…

11114254_10153191175476278_1835471660742839797_n

a Rafflecopter giveaway

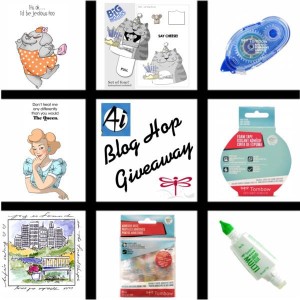
The Tombow USA prize includes: Tombow Mono Adhesive Permanent, NEW Tombow Adhesive Dots, Tombow Mono Multi Liquid Glue and NEW Tombow Foam Tape.


The Art Impressions prize includes: Elephant Set, Cat Big Mouth, The Queen Set and Joy Found Window.


To win, enter on the Rafflecopter above! You have until May 5th at 11:59 EST to enter. A winner will be picked randomly and announced on May 6th 2015.


Remember to “Like” Tombow USA and Art Impressions on Facebook!


YOUR NEXT STOP IS Jennie Garcia!


Here is the line up in case you get lost.


Art Impressions Blog

Cheri Burry

Beth Watson

Dana Warren

Daniella Hayes

Diane Zechman

Jennie Garcia

Karen Day

Jennifer Priest

Kerry Kung

Latrice Murphy

Reneé Matarese

Sharon Caudle

Tombow USA Blog

Thanks for popping in!

Diane Signature

stamps- Art Impressions Loungers Set (4473) and Beach TryFolds Set (4577); paper- Cougar white 100#; SU! Baja Breeze and Daffodil Delight, The Paper Studio- Girl Multi Stripes; ink- Memento Tuxedo Black; accessories- Tombow Mono Multi Liquid Glue, Foam Tape, and Mono Adhesive Permanent (tape runner), Scor-Pal, tracing wheel, SU! Jumbo Eyelets, Crop-A-Dile, Copics, cording, Clear Wink Of Stella, Summer Mudd Puddles, BossKut Sun die.

winter ATC frame

Hello friends!  I have a special project to share today that I made for a Christmas gift.  I wanted the recipient to be able to enjoy it all winter long, though, so I went with a snowy/winter theme.  Each little card in my frame is ATC size (2 1/2 x 3 1/2 inches) and I used lots of my favorite Sweet ‘n Sassy stamps and dies.

I also made this for our Challenge Chicks Challenge…this month Anna wants us to create winter scenes!

SNSS ATC frame diane zechman

I wanted to be able to switch out the ATC’s for each season/holiday or whatever theme I want…so they were attached in the frame with Removable Glue Dots.  I found these to work perfectly for the right amount of adhesion needed, yet still be able to be easily removed.

Here’s some close-ups of each ATC.  For the first one I made a rosette with my Scor-Pal and centered it onto a Sweet ‘n Sassy Large Snowflake diecut.  The “brrr” is from my Snowman Soup stamp set and the background was embossed with the Cuttlebug Kars Snowflake embossing folder.

The second one has some stamped skating friends from the SNSS Winter Silhouettes stamp set, with one popped up for dimension.  There’s a few tiny snowflakes from my Snowy Hello stamp set lightly added to the top.  The edges of this one were stitched on my sewing machine.

SNSS ATC frame 2 diane zechman

The mittens were made with a SU! punch and the white tiny clothespins came from Michael’s.  They were attached with 1/8″ Scor-TapeCrochet thread was perfect for the string.

The Let it Snow words are a Sizzix die and I faintly stamped snowflakes in the background from the Spectacular Snowflakes.

SNSS ATC frame 3 diane zechman

On the left, below, I used one of the Bookmarks & More dies to create a tag. The heart was cut from the Heart dies and the tiny snowflakes and words are from my Snowy Hello set.  The snowflake charm is SU!

On the right the background was embossed with the Sizzix Snowflakes #3 folder.  3 circles were punched and popped for dimension.  The snowman’s face, hat and scarf are from the Warm Hello stamps.

SNSS ATC frame 4 diane zechman

The tree, deer, and bird, below are from Forest Silhouettes dies. On the right, I lightly stamped the Music Background.  More Snowy Hello flakes were stamped (this time in green) and the bird from Peace of God was popped up.

SNSS ATC frame 5 diane zechman

The Hillside Edges dies made a cute snowy scene and the words from Winter Silhouettes went with it perfectly.  Then I stamped the sleigh ride image from one of my fave Christmas sets, Old Fashioned Christmas.  The top border was punched with the Martha Stewart Icicles punch.

SNSS ATC frame 6 diane zechman

The words and snowy fella below, drinking hot cocoa, is from my Snowman Soup set.  The mug, scarf, and mittens were paper pieced.  Then I applied a Puffy Velvet Fabric marker (like Liquid Applique) to the marshmallows and heat them with a heat tool to puff them up.

The skates are a Sizzix Movers & Shapers die.  The blades were heat embossed with silver e.p. and the Martha Stewart branch punch, along with a tiny jingle bell, finished them off.  You can’t see in the pic but the skates were painted with Picket Fence Crackle Paint.

SNSS ATC frame 7 diane zechman

Lots of glitter and bling were added to each one to make this frame sparkle!  My ATC memory tray was purchased at Hobby Lobby.

Please join us and create a card with a winter scene… then share it on our Facebook page!  Also, you can upload it to the Splitcoast gallery…and use the keyword CHXJAN15.  Now be sure to click on the links below to check out what the other Chicks created!

challenge chicks logo small

stamps- Sweet ‘n Sassy Snowman Soup, Winter Silhouettes, Old Fashioned Christmas, Warm Hello, Peace of God, Music Background, Snowy Hello, and Spectacular Snowflakes;

paper- white, SU! Soft Sky, Certainly Celery, and Always Artichoke, SU! Wintergreen dsp;

ink- Memento Tuxedo Black, Versafine Black, Versamark, SU! Soft Sky and Always Artichoke;

accessories- Sweet ‘n Sassy dies (Large Snowflakes, Forest Silhouettes, Hillside Edges, Bookmarks & More, and Hearts), Scor-Pal, Scor-Tape, Cuttlebug Kars Snowflakes emb. folder, circle punches, hot glue gun, tracing wheel, sewing machine, Stickles, rhinestones, foam dots, Wink of Stella clear, Cuttlebug Snowflakes #2 die, Martha Stewart Icicles punch, SU! Square Lattice emb. folder, SU! mitten punch, SU! snowflake charm, Copic markers, Sizzix Snowflakes #3 emb. folder, ribbon, crochet thread, mini clothespins, Sizzix Let it Snow #2, Sizzix Movers & Shapers ice skate die, Puffy Velvet Fabric marker, Ranger Picket Fence Crackle Paint, silver embossing powder, tiny jingle bell, Martha Stewart branch punch.

Here are the Sweet ‘n Sassy products that I used…


rosette ornaments

It’s the first day of the month and that means it’s time for a new Scor-Pal challenge!  This month’s theme is Christmas/Holidays.  I made a set of 3 rosette ornaments using my Scor-Pal and some Sweet ‘n Sassy stamps and dies.

rosette ornaments 1 diane zechman

rosette ornaments 2 diane zechman

rosette ornaments 3 diane zechman

rosette ornaments 4 diane zechman

I used the Christmas Silhouettes stamps and matching dies, along with some pretty sheet music patterned paper.  To make the rosettes, start with 3 strips of the patterned paper (1/2 x 12, 1 x 12, and 1 3/4 x 12) and score them every 1/4″.  To heat emboss the edges of the rosettes, roll them over a Versamark ink pad and add powder, then heat.

Now check out the other fun projects on the Scor-Pal blog and play along!

stamps- Sweet ‘n Sassy Christmas Silhouettes; paper- SU! Cherry Cobbler, Vanilla, Echo Park- Christmas Carol; ink- Versamark, Cherry Cobbler; Accessories- Scor-Pal, Scor-Tape, Sweet ‘n Sassy Christmas Silhouettes dies and Large Snowflake dies, circle punches, hot glue gun, Cherry Cobbler embossing powder, rhinestones, silver cording.
Scor-pal scor-tape christmas silhouettes christmas silh dies large snowflake dies


give thanks Silverware Pocket

Another Halloween has come and gone and we are movin’ on to Thanksgiving!  Seriously…is it November already?

The first day of the month means it’s time for a new Scor-Pal challenge.  This month’s theme is Family/Thanksgiving.  When families get together, we usually eat!  So today’s project is all about the Thanksgiving table and giving thanks.

I created a super simple Silverware Pocket that would look great at each place setting.  (Or they would look cute to fill them up and place them all in a basket if you have a large family gathering and serve the food buffet style.)

give thanks silverware pocket diane zechman

I didn’t add the napkin behind the utensils so I could get a photo of the scored back but you can easily slip a napkin in there too and they’d be good to go!

To make the pocket, I started with a piece of 4 1/4″ x 11″ cardstock (half a sheet).  Score the 11″ side at 4″ and fold.

Next I diagonally scored the back every 1/2″ in both directions.

Finally, use Scor-Tape on both sides of the pocket to keep it closed, or stitch with a sewing machine as I have done.  Then decorate your silverware pocket as desired.

Now check out the other fun projects on the Scor-Pal blog and play along!

stamps- Sweet ‘n Sassy- Season of Change, So Grateful, and Grunge Borders; paper- SU! Crumb Cake, Cherry Cobbler, white; ink- SU! Soft Suede, Tangerine Tango, Crushed Curry, and Pear Pizzazz; accessories- Scor-Pal, Scor-Tape or sewing machine, Sweet ‘n Sassy- Season of Change Leaf dies and Bookmarks & More dies, red twine, metal clip, button, crochet thread.

an ATC Swing Card

On Tuesday I shared one of my ATC swaps, a tiny Pop Up Box Card.  Today I have the other ATC I made…a mini Swing Card.  I started with some cute dimensional mummy stickers from Michael’s and created my card around them.

boo to you ATC 1 diane zechman

I used the SU! Monster Munchies set on the back of the swinging panel.

boo to you ATC 2 diane zechman

I sketched and cut my template onto some scrap cardstock and scribbled a few measurements so I wouldn’t forget.  😉  Here’s a quick pic of the template I made and I’ll type the directions below.

ATC Swing Card

First you need to start with a 3 1/2″ x 3 1/2″ square of cardstock.

To make the top and bottom cuts:  Place the left edge of one side at the 2 3/4″ mark on your paper trimmer (a guillotine style will not work here).  Cut from the 3/4″ mark on the blade guide to the 1 1/2″ mark.  Lift the blade slightly (do not move the paper) and skip a small section…now lower the cutting blade and cut from the 2″ mark to the 2 3/4″ mark.  Flip the cardstock 180 degrees and repeat.

Now turn the cardstock 90 degrees.

To make the side cuts:  Place the left edge at 2 3/4″.  Lower the blade and cut from the 3/4″ mark to the 2 3/4″ mark. Flip the cardstock 180 degrees and repeat.

Now score the top and bottom with the scoring blade or a Scor-Pal @ 1 1/2″ and 2″ (do not score through the middle).

Decorate as desired!

stamps- SU! Monster Munchies; paper- black, SU! Dusty Durango, K&Company KP Halloween, MME- Boo To You; ink- Versafine Black, Colorbox Stephanie Barnard- Plum; accessories- Martha Stewart Iron Fence punch, Recollections Dimensional Stickers, Scor-Pal, star punch, Cuttlebug Star die, rhinestones.

Pop Up Box Card (ATC size)

A few weeks ago I participated in an ATC swap (artist trading card) and made 2 different ATC’s with fancy cuts and folds.  My Scor-Pal and Scor-Tape, which I couldn’t do without, came in very handy!  (Have you seen the new Scor-Pal Eighths? Check out the pics below!)  Here’s my first ATC from this swap…be sure to check back for the other one.

Witch way to the candy?

witch way ATC diane zechman

When the box folds flat, it measures 2 1/2″ x 3 1/2″, ATC size.  Note: This is an adaptation of the Pop Up Box card.

For the ATC box card base you will need 2 pieces of cardstock: one piece measuring 3 1/2″ x 5 1/2″ and one 3/4″ x 2 1/2″ strip.  *To easily cut these without waste, start with a quarter sheet of cardstock- 4 1/4 x 5 1/2.  Cut this down to 3 1/2 x 5 1/2.  Then cut the remaining strip to the 3/4 x 2 1/2 size needed.

Using your Scor-Pal, score the long side of the 3 1/2 x 5 1/2 piece @ 1 1/4, 2 1/2, 3 3/4, and 5″.  Turn it counter-clockwise 1/4 turn and score again @ 1 1/4″.  Crease the folds and cut the top flaps down to the 1 1/4″ scored line as shown below.  Remove the top section of the 1/2″ flap, angling the cut as shown.

witch way ATC 2 diane zechman

Add Scor-Tape to the remaining 1/2″ flap, fold and adhere box.

Next score each end of the small strip @ 5/8″. (Or score @ 5/8″ and 1 7/8″)

witch way ATC 3 diane zechman

Crease the folds and adhere each flap inside the top of the box card.  This piece is what you will adhere your images, etc. to.  See the finished box for placement…

witch way ATC 4 diane zechman

The patterned paper layers to finish the ATC card will be the following sizes… 1″ square, 1 x 2, and 1 x 3 1/4 (for the inside of the back).

Now…witch way to the candy?  🙂

stamps- SU! Home Is Where The Haunt Is, candy corn- $1 stamp from ?, words- computer; paper- black, white, K&Company- KP Halloween; ink- Memento Tuxedo Black, Versafine Black, SU! Daffodil Delight; accessories- Scor-Pal, Scor-Tape, Copics, foam dots, 10 mil clear acetate, Martha Stewart Mice punch.


a Halloween box card

Wow…is it October already?  The leaves are getting gorgeous here in PA.  I wish we could have fall weather all year ’round!

Today starts a new challenge on the Scor-Pal blog!  This month’s theme is Fall/Halloween.  We’d love for you to play along with us and make a fall or Halloween project!  I used the Pop Up Box Card tutorial on the Splitcoast website to make my card.  (I followed the measurements at the end for a horizontal A2 card).

Halloween box card diane zechman

These cards are so fun and pretty easy…I can’t believe it took me almost a year to try them.  I think they could be quite addicting!  (Thanks, Jeannette, for the little push you gave us to try them.)

Come join us on the Scor-Pal Blog for our new Challenge!

paper- SU! Tangerine Tango, K&Company dp; accessories- Scor-Pal, Scor-Tape, K&Company Layered Accents, Martha Stewart Mice and Graveyard punches.

blessings box

Today starts a new challenge on the Scor-Pal blog!  This month’s theme is Storage Ideas.  We’d love for you to play along with us and make a project that can be used for any type of storage!  I used the Soap Box tutorial on the Scor-Pal website and some NEW Sweet ‘n Sassy stamps to create a little divided box to store some paper flowers, buttons, trinkets, or anything you can think of.

blessings box 1 diane zechman

Here’s the inside with the dividers.  The Scor-Pal and Scor-Tape are awesome tools to create beautiful boxes, etc.!

blessings box 2 diane zechman

I filled the box with flowers to take the photo but you could use it to hold any little treasures you want…or maybe little truffles?  😉

blessings box 3 diane zechman

I used stamps from the Sweet ‘n Sassy Autumn Mums bundle…available to order NOW in the new Sweet Perks Club!  Here’s a close up of the flower.

blessings box 4 diane zechman

Yup, I used the Wink of Stella clear brush on it!

Come join us on the Scor-Pal Blog for our new Challenge!  And be sure to check out the new Sweet ‘n Sassy Sweet Perks Club for a discount on your favorite stamps and dies!

stamps- Sweet ‘n Sassy Autumn Mum Greetings and So Grateful; paper- pale yellow, black, The Paper Cut- Aqua Blue and Silver; ink- SU! Crushed Curry, Memento Tuxedo Black, Versafine Black; accessories- Scor-Pal, Scor-Tape, tracing wheel, Spellbinders Scalloped Squares, ribbon, foam tape, Copics, Wink of Stella clear, rhinestones, adhesive pearls.


birthday cookie

Today starts a new challenge on the Scor-Pal blog!  This month’s theme is Food For Thought.  We’d love for you to play along with us and make a card or project that is food related!  I used the tutorial for a Mini Pizza Box and created a little treat box to hold a birthday cookie.  (Because who doesn’t love a chocolate chip cookie??) 

After cutting and scoring the box, I added the patterned paper (which is very sparkly) to the top.  Then I die cut a window and added a die cut frame.  The inside of the window was lined with a piece of clear acetate.  Then the box was adhered with Scor-Tape.  A half circle was punched on the front of the lid to ease in opening the box.

Finally, I used some Sweet ‘n Sassy stamps to decorate my box.  The flower and matching die is from Long Stem Silhouettes, the butterflies and coordinating dies are from Majestic Monarchs, and the sentiment is from Birthday Word Art.  Some clear Wink Of Stella was applied to the butterflies and flowers for some added sparkle which unfortunately doesn’t show up in the photo.

Here’s a photo of the box open.

What a cute little way to wish someone a happy day, don’t you think?

stamps- Sweet ‘n Sassy- Long Stem Silhouettes, Majestic Monarchs, and Birthday Word Art; paper- SU! Daffodil Delight, Peach Parfait, DCWV Citrus; ink- SU! Poppy Parade, Pear Pizzazz, Daffodil Delight, Memento Tuxedo Black; accessories- Scor-Pal, Scor-Tape, clear acetate sheet, Labels 3 Nestabilities, SNSS Long Stem Silhouettes dies and Majestic Monarchs dies, foam tape, adhesive pearls, circle punch, clear Wink of Stella.

paper dresses, purses, and shoes

On Saturday we had a bridal shower for my daughter, Kayla.  I still can’t believe my girls are all grown up!  For her shower we went with a girly theme.  I made some paper purses and shoes for the table centerpieces and die cut lots of dress boxes for favors.  They were a lot of fun and turned out quite cute, I think!  My Scor-Pal was a life-saver and I used lots and lots of Scor-Tape!

A friend helped me to trace and cut the purses and shoes that were done by hand with patterns or templates.  I went to Michael’s and bought 2- 12×12 paper packs (Recollections- Dreaming In Color) so the projects all coordinated.  The first three purses are a template by Becky Roberts.  The next three were done by making up my own measurements and were inspired by one my friend Tracy made a few years ago.  The last two purses were cut with my Sizzix Bigz Pro Pillow Purse die.  I used two patterns for the shoes… the Slip On Mule is by Stacy Cohen and the other shoe template is by Ellen Hutson.

Here they are… what fun to create and embellish!  Do you have a favorite?

After the purses and shoes were decorated, I started making dress boxes for favors.  These were die cut with the Sizzix Bigz Pro Dress Box die.  I made over 40 and they all turned out a bit different.  Here’s just a few…

Thanks for popping in.  I will share more shower pics soon.  The games were fun too!  😉