
Happy Easter! I hope you and your family had a wonderful Easter day! We had ham with family on Friday so I cooked a different family favorite for lunch and then we had lots of leftovers (including the ham) for supper. It was a nice, relaxing day! I think our colored eggs are all gone by now. I never tire of that tradition!  It must be the crafter in me. 😉
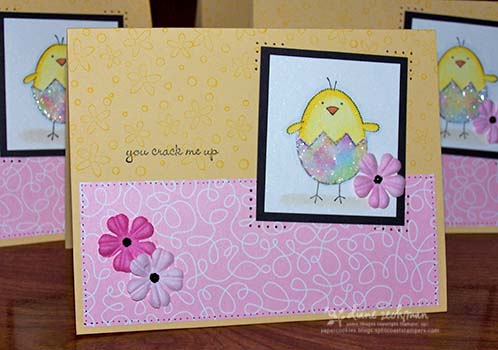
This afternoon I sat down to make a few cards with the set A Good Egg. I have been wanting to make these cards for weeks! I originally wanted to make Easter cards but since I ran out of time, I just made them into a friendly spring card instead. I love how the set is versatile and doesn’t haven’t to be used just for Easter!
When I first saw the set in the new catalog, I knew I wanted to try a technique that I did years ago. The shell that the chick is in was made with real eggshells! They have been sitting in a dish on my counter for a few weeks waiting for this project. LOL. I don’t quite remember the proper technique and I was a little too lazy to look it up, so I just did what I remembered or thought would turn out ok.
To make the eggshell piece:
I started by running a piece of white cardstock through my Xyron machine so one side was covered with adhesive. Then I covered the adhesive with bits of broken eggshells (removed from hard boiled eggs). This takes a little time and patience to get it covered. Turn it over and gently press on the back so that the shells stick well. Next I used my waterbrush and various reinkers to watercolor the shells. Let it dry completely. Then I pressed the eggshell side onto my Versamark pad and heat embossed it with Iridescent Ice embossing powder so it would have some sparkle. I stamped my images on top with SU! Black ink and *carefully* cut them out. Then I applied Crystal Effects to help keep the shells from cracking off and give it a nice smooth finish. You may be able to apply the Crystal Effects before cutting the images out- try experimenting. It may be easier to cut that way.
This is a very simple layout but I wanted the technique to be the focus. I added a black dotted border around the designer paper to match the dotted chick. And I pierced some holes at each corner to help draw the attention to the main image.
Here’s a pic of the finished card….
….and a close-up so you can see the eggshells better.

stamps- A Good Egg
paper- Shimmery White, Saffron, Black, retired Tickles dp
ink- Black, Summer Sun, Pumpkin, various re-inkers
accessories- egg shells, Versamark, Iridescent Ice ep, Xyron, waterbrush, Crystal Effects, Black Diamond Stickles, Primas, paper piercing tools
 cookiestamper ♥


13 responses to “yes, they’re real eggshells!”